💡 Pro-Tip for Amigurumi Makers: Because this kitty is designed to sit upright on desks or shelves, keeping the bottom base completely flat during stuffing is essential! Avoid over-stuffing the lower rounds (R1–R8) so the cat maintains its balanced, weighted bottom without wobbling.
Table of Contents
- 1. Project Overview & Specifications
- 2. Materials, Tools & Yarn Substitutions
- 3. Key Crochet Abbreviations
- 4. Step-by-Step Pattern: Continuous Body & Head
- 5. Step-by-Step Pattern: Oval Belly Patch
- 6. Step-by-Step Pattern: Arms, Feet & Soft Tail
- 7. Step-by-Step Pattern: Layered Ears, Sage Cap & Scarf
- 8. Master Assembly & Facial Embroidery Guide
- 9. Frequently Asked Questions (FAQ)
- 10. Download Free Printable PDF
1. Project Overview & Specifications
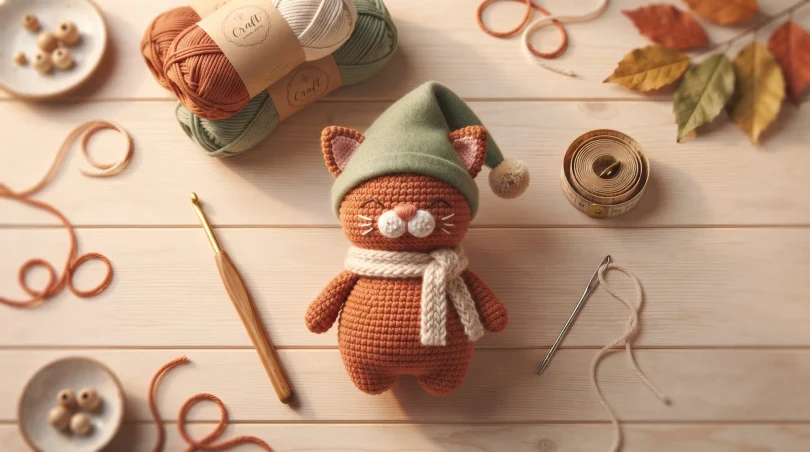
The Cozy Cat Gnome is designed with a pear-shaped silhouette worked continuously from the base up through the top of the head. What makes this design special is how its accessories interact with the main body: the gnome cap sits right above the eyes with a wide 42-stitch opening, allowing the cat’s ears to remain completely visible on either side.- Skill Level: Confident Beginner to Easy Intermediate
- Finished Height: Approximately 18 cm (7 inches) including the gnome cap
- Design Construction: 1-piece continuous head & body, flat-bottom base, separate sewn accents
- Pattern Terminology: Standard US Crochet Terms
- Safety Note: Features 100% embroidered facial details (no plastic safety eyes or wires), making it a soft decorative piece
2. Materials, Tools & Yarn Substitutions
For best results, we recommend using a smooth DK weight cotton yarn. Smooth cotton provides crisp stitch definition, ensuring the clean lines of the body and cap stand out beautifully.- Terracotta Yarn (DK Weight / ~40g): Main body, head, arms, feet, outer ears, and soft tail
- Cream Yarn (DK Weight / ~15g): Oval belly patch, inner ear inserts, and woven scarf
- Sage Green Yarn (DK Weight / ~15g): Short gnome cap
- Crochet Hook: 3.0 mm reference hook (or size needed to achieve tight, gap-free amigurumi stitches)
- Embroidery Thread: Dark brown or black stranded embroidery floss for the facial features
- Notions & Supplies: Premium polyester fiberfill stuffing, stitch markers, yarn needle, embroidery needle, and scissors
Yarn Substitution Tip: Can you use Chenille / Velvet blanket yarn? Yes! However, keep in mind that switching to plush chenille yarn with a 4.5 mm or 5.0 mm hook will double the finished size of your cat gnome to around 30–35 cm (12–14 inches).
3. Key Crochet Abbreviations
- MR: Magic Ring
- sc: Single Crochet
- inc: Increase (work 2 single crochets in the same stitch)
- dec: Invisible Decrease (single crochet 2 stitches together using front loops only)
- BLO: Back Loop Only
- ch: Chain
- sl st: Slip Stitch
- sts: Stitches
4. Step-by-Step Pattern: Continuous Body & Head
Work continuously in rounds using Terracotta yarn. Do not join rounds with a slip stitch unless explicitly instructed. Place a stitch marker in the first stitch of each round to keep track of your count.Lower Base & Body Section
- Round 1: 6 sc in MR (6 sts)
- Round 2: inc in every stitch around (12 sts)
- Round 3: [1 sc, inc] x6 (18 sts)
- Round 4: [2 sc, inc] x6 (24 sts)
- Round 5: [3 sc, inc] x6 (30 sts)
- Round 6: [4 sc, inc] x6 (36 sts)
- Round 7: [5 sc, inc] x6 (42 sts)
- Round 8: [6 sc, inc] x6 (48 sts)
- Round 9: Working in BLO: sc in every stitch around (48 sts) — This creates the crisp bottom ridge for the flat base.
- Rounds 10–15: sc in every stitch around (6 rounds total) (48 sts)
- Round 16: [6 sc, dec] x6 (42 sts)
- Round 17: sc in every stitch around (42 sts)
- Round 18: [5 sc, dec] x6 (36 sts)
- Round 19: sc in every stitch around (36 sts)
- Round 20: [4 sc, dec] x6 (30 sts)
- Round 21: [3 sc, dec] x6 (24 sts)
- Round 22: sc in every stitch around (24 sts) — This narrow 24-stitch round forms the neck. Begin stuffing the lower body firmly while keeping the base flat!
Head Expansion & Crown Closure
- Round 23: [3 sc, inc] x6 (30 sts)
- Round 24: [4 sc, inc] x6 (36 sts)
- Round 25: [5 sc, inc] x6 (42 sts)
- Rounds 26–31: sc in every stitch around (6 rounds total) (42 sts)
- Round 32: [5 sc, dec] x6 (36 sts)
- Round 33: [4 sc, dec] x6 (30 sts)
- Round 34: [3 sc, dec] x6 (24 sts)
- Round 35: [2 sc, dec] x6 (18 sts) — Stop here to embroider the sleeping face and stuff the head firmly!
- Round 36: [1 sc, dec] x6 (12 sts)
- Round 37: dec x6 (6 sts)
5. Step-by-Step Pattern: Oval Belly Patch
Using Cream yarn, work around both sides of a foundation chain to form a smooth oval patch. Do not stuff this piece.- Round 1: Ch 7. Starting in the 2nd chain from hook: 5 sc, work 3 sc in the last chain. Turning to work along the opposite side of the chain: 4 sc, then 2 sc in the very first chain space (14 sts).
- Round 2: inc in first st, 4 sc, inc x3 in end stitches, 4 sc, inc x2 (20 sts).
- Round 3: [1 sc, inc], 4 sc, [1 sc, inc] x3, 4 sc, [1 sc, inc] x2 (26 sts).
- Round 4: [2 sc, inc], 4 sc, [2 sc, inc] x3, 4 sc, [2 sc, inc] x2 (32 sts).
6. Step-by-Step Pattern: Arms, Feet & Soft Tail
Arms (Make 2)
Using Terracotta yarn:- Round 1: 6 sc in MR (6 sts)
- Round 2: [1 sc, inc] x3 (9 sts)
- Rounds 3–4: sc in every stitch around (9 sts)
- Round 5: [1 sc, dec] x3 (6 sts)
- Rounds 6–10: sc in every stitch around (5 rounds total) (6 sts)
Seated Feet (Make 2)
Using Terracotta yarn:- Round 1: 6 sc in MR (6 sts)
- Round 2: inc in every stitch around (12 sts)
- Round 3: [1 sc, inc] x6 (18 sts)
- Round 4: Working in BLO: sc in every stitch around (18 sts)
- Round 5: sc in every stitch around (18 sts)
- Round 6: [1 sc, dec] x6 (12 sts)
- Round 7: sc in every stitch around (12 sts) — Add a small pinch of stuffing here.
- Round 8: dec x6 (6 sts)
Soft Curled Tail
Using Terracotta yarn:- Round 1: 6 sc in MR (6 sts)
- Rounds 2–11: sc in every stitch around (10 rounds total) (6 sts)
7. Step-by-Step Pattern: Layered Ears, Sage Cap & Scarf
Outer Ears (Make 2) — Worked Flat in Rows
Using Terracotta yarn. Ch 1 and turn between rows (turning chain does not count as a stitch):- Row 1: Ch 2, work 2 sc in 2nd ch from hook, turn (2 sts)
- Row 2: inc in both stitches, turn (4 sts)
- Row 3: inc, 2 sc, inc, turn (6 sts)
- Row 4: inc, 4 sc, inc, turn (8 sts)
- Rows 5–6: sc across, turn (8 sts)
Inner Ear Inserts (Make 2) — Worked Flat in Rows
Using Cream yarn. Ch 1 and turn between rows:- Row 1: Ch 2, work 1 sc in 2nd ch from hook, turn (1 st)
- Row 2: inc in the stitch, turn (2 sts)
- Row 3: inc in both stitches, turn (4 sts)
- Row 4: sc across (4 sts)
Short Sage Gnome Cap
Using Sage Green yarn. Worked in continuous rounds:- Round 1: 6 sc in MR (6 sts)
- Round 2: inc in every stitch (12 sts)
- Round 3: sc in every stitch (12 sts)
- Round 4: [1 sc, inc] x6 (18 sts)
- Round 5: sc in every stitch (18 sts)
- Round 6: [2 sc, inc] x6 (24 sts)
- Round 7: sc in every stitch (24 sts)
- Round 8: [3 sc, inc] x6 (30 sts)
- Round 9: [4 sc, inc] x6 (36 sts)
- Round 10: [5 sc, inc] x6 (42 sts)
- Round 11: Working in BLO: sc in every stitch (42 sts)
- Round 12: sc in every stitch (42 sts)
Cream Woven Scarf
Using Cream yarn:- Row 1: Ch 46. Starting in 2nd ch from hook: sc across each chain, turn (45 sts)
- Rows 2–4: Ch 1, sc across, turn (45 sts)
8. Master Assembly & Facial Embroidery Guide
Precision pin placement is key to securing that perfectly sweet gnome expression!- Embroider the Face: Before closing the head completely (around Round 35), pin two closed sleeping eyes across Rounds 27–28 (spaced about 4–5 stitches apart) and a small upside-down triangular nose at Round 26 using dark brown thread. Stitch a tiny vertical line extending down from the nose for the mouth.
- Attach the Cream Belly: Pin the oval patch vertically to the front tummy between the flat base ridge and the neck line. Sew flat around the outer edges using the long cream yarn tail.
- Position the Feet: Pin both feet to the lower front near Rounds 9–11 on either side of the belly. Ensure the flat body base remains flush on the table surface.
- Attach the Arms: Sew the flat 3-stitch top edges of the arms to the sides near Rounds 20–22, allowing the paws to rest forward alongside the cream belly.
- Fit the Cap & Ears: Place the sage cap over the crown so the brim sits just above the embroidered eyes. Pin the assembled ears to Rounds 31–33 on either side. Adjust placement so the tips poke out clearly from beneath the hat. Sew the ears directly to the head (not through the cap).
- Attach Tail & Scarf: Sew the closed base of the tail near Round 11 at the back. Curve it around the side hip and add one discreet tacking stitch to hold the curve. Finally, wrap the cream scarf loosely around the neck and overlap the ends.
9. Frequently Asked Questions (FAQ)
Is the gnome cap glued or sewn permanently to the head?
It can be either! The pattern is engineered so the cap fits securely without glue. You can leave it completely removable or secure it with two tiny hidden stitches at the back of the head.
Why are my cat’s feet making the amigurumi tilt backward?
This happens if the feet are attached too low beneath the base fold. Make sure to pin the feet to the front vertical wall (Rounds 9–11) rather than the bottom flat circle (Rounds 1–8).
Can I add plastic safety eyes instead of embroidered eyes?
Yes! If you prefer safety eyes, insert 8 mm or 10 mm eyes between Rounds 27 and 28 before closing Round 35.
10. Download Free Printable PDF Pattern
Love working from printed physical patterns in your craft room? Download the full PDF draft version including illustrated assembly schematics and checklist records!📄 Download Free Cozy Cat Gnome PDF Pattern
Happy crocheting! Don’t forget to share your finished Cozy Cat Gnomes with us on Pinterest or tag us in your craft posts!