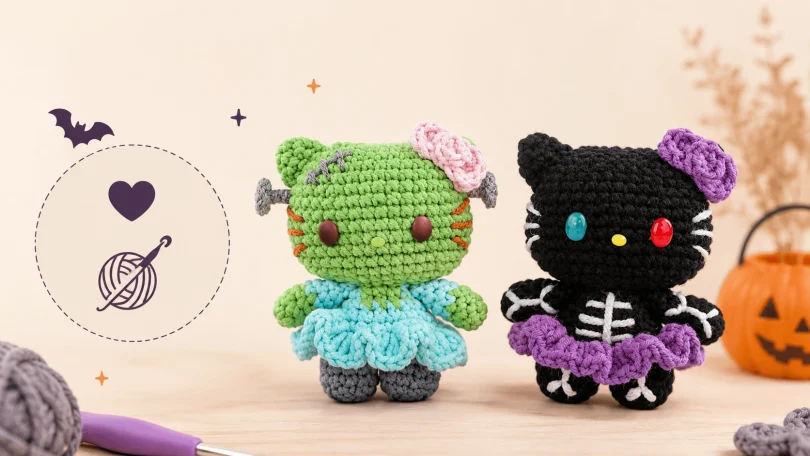
Halloween is coming soon, and it is the perfect time to give a classic character a spooky makeover. This project transforms the regular Hello Kitty amigurumi into two festive, spooky-cute characters: Frankenstein Kitty and Skeleton Kitty. The base pattern is the same as a classic Hello Kitty, but with just a few clever yarn color changes and embroidered details, they instantly shift into Halloween style.
Quick Project Details:
- Skill Level: Intermediate
- Estimated Time: 4–6 hours
- Techniques: Oval foundation chains, color changing, embroidery, wire-wrapping.
Materials and Tools
Yarn
- Brand: Susan’s Family 4-ply cotton yarn.
- Colors (Frankenstein): Green (skin), Blue (dress), Gray (scar embroidery).
- Colors (Skeleton): Black (main body) and White (bone embroidery).
Hook Size & Hardware
- 3.0 mm crochet hook.
- 7mm oval-shaped eye beads (you can use an acrylic pen to color them if needed).
- A short piece of wire (for Frankenstein’s neck bolts).
Notions
- Polyester fiber stuffing and a stuffing tool.
- Yarn needle and scissors.
- Stitch markers.
- A lighter (used to melt and flatten the back of the eye beads to secure them firmly).
Pattern Notes & Basics
Abbreviations (US Terms)
| ch: chain | sc: single crochet |
| hdc: half double crochet | dc: double crochet |
| inc / dec: increase / decrease | BLO / FLO: back/front loop only |
Special Stitches & Techniques
- The “X” Stitch: This pattern highly recommends using the “yarn under” technique for your single crochets instead of “yarn over”. This creates an X-shaped stitch that helps keep your amigurumi stitches straight and prevents them from slanting to the right.
- Invisible Decrease: Insert your hook into the front loop of the next two stitches, yarn under and pull through both front loops, then yarn under again and pull through the remaining loops. This creates a smoother, less noticeable decrease.
- Oval Foundation: The head does not start with a magic ring. You will begin by crocheting into a foundation chain, working first into the back bumps, and then looping around to the other side to create a neat oval base without gaps.
Main Body & Instructions
Because this pattern involves specific shaping, color changes, and delicate assembly, I have prepared a full step-by-step video tutorial. Follow along with the video to get your stitch counts perfectly right!
Step 1: The Head
Start with a foundation of 6 chains without a slip knot. You will crochet in the round to form an oval, building up to a maximum of 38 stitches between rounds 8 and 13 before decreasing. Place the 7mm oval eyes on round 10 (with about 7 stitches between them) and the nose right in the center between rounds 11 and 12.
Step 2: The Signature Ribbon
Hello Kitty needs her bow! This is constructed starting with 6 sc in a magic ring for the center. The sides of the bow are built using a sequence of half-double crochets (hdc) and double crochets (dc) worked directly into a chain. Sew this onto the left ear.
Step 3: Frankenstein’s Body & Dress
The legs start with a magic ring and are joined together at round 5. For the dress, you will switch to blue yarn on round 6. On round 7, you must crochet in the Back Loop Only (BLO). Later, you will attach your yarn to those unused front loops (FLO) on round 7, chaining 2 and working 3 double crochets into each stitch to create the ruffled skirt.
Step 4: Skeleton Modification
If you prefer the Skeleton Kitty, follow the exact same body and head pattern, but use entirely black yarn. Once the body is finished, use white yarn and a tapestry needle to embroider the skull and bone details across the body, hands, and legs.
Frequently Asked Questions (FAQ)
Can I use this tutorial to make a normal Hello Kitty?
Yes! The base pattern is identical to a standard Hello Kitty amigurumi. Just skip the spooky embroidery, use white yarn for the head and limbs, and pick your favorite color for her dress.
How do I make Frankenstein’s neck bolts?
Make a small “button head” by crocheting 6 sc into a magic ring and fastening off. Take a short piece of wire, place the crochet circle in the center, and use the leftover yarn tail to wrap the wire neatly. Secure these pins to both sides of the neck with glue or by tying the tails tightly.
Conclusion & Wrap-Up
Finishing Steps & Assembly:
When assembling your Hello Kitty, make sure all pieces are firmly stuffed with polyester fiber so they hold their shape.
- Sew the ears evenly onto the head between rounds 3 and 7.
- Embroider the cat’s whiskers evenly on both sides of the face around rounds 8 to 12.
- For Frankenstein Kitty, use gray yarn to embroider a jagged little scar pattern right on the forehead.
Weave in all remaining ends securely. If you loved making these two spooky characters, stay tuned—a Witch Hello Kitty with a custom hat is next in the series!