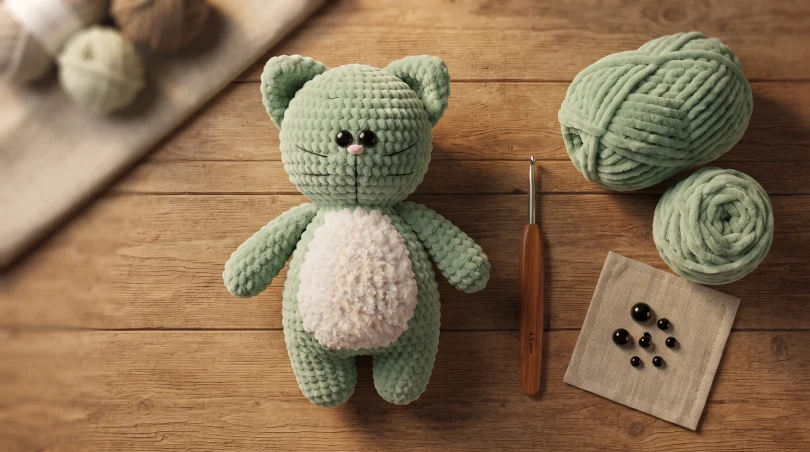
It’s always a good day to make a plush cat amigurumi! If you are looking for a quick, fuzzy, and utterly adorable project, this free pattern is just what your crochet basket needs. Originally designed by
nadi.ivanova_toys, this delightful plush cat features a signature furry belly and closely set eyes reminiscent of classic Russian amigurumi designs.
Because it is worked up using soft velvet plush yarn, it works down quickly and creates an exceptionally huggable toy. Whether you choose a vibrant light green or any other custom color of your choice, this step-by-step guide will walk you through every single part.
Materials & Tools Needed
- Plush Yarn: 1 skein of plush yarn (such as Himalaya Dolphin Baby, 100g / 120m). One skein is usually enough, but having an extra 10–15 meters on hand as a margin is recommended.
- Contrast Yarn: Alize Softy yarn (half a skein) for the furry belly.
- Crochet Hooks: Hook number 4 (for the main plush body) and hook number 2 (for the belly piece).
- Safety Eyes: 12 mm eyes.
- Toy Filler / Holofiber: For stuffing the head, body, and limbs firmly.
- Embroidery Threads: Black and pink floss threads for the nose and whiskers/antennae.
- Sewing Supplies: White sewing threads for attaching details, a sewing needle, and scissors.
- Stitch Marker: To track your rounds.
Key Crochet Abbreviations
- sc: Single Crochet
- inc: Increase
- dec: Decrease
- st: Stitch
- hdc: Half Double Crochet
- sl-st: Slip Stitch
- ch: Chain
- ..in: Make an increase into the same stitch as many times as indicated by the number in front (e.g., 3inc, 4inc)
- FLO: Crochet into Front Loops Only
- BLO: Crochet into Back Loops Only
Step-by-Step Amigurumi Pattern
1. Head
Start the head using a magic ring. Stuff the head firmly as you crochet.
- 1 Rnd: 6 sc in MR (6)
- 2 Rnd: 6 inc (12)
- 3 Rnd: (1 sc, inc)*6 (18)
- 4 Rnd: (2 sc, inc)*6 (24)
- 5 Rnd: (3 sc, inc)*6 (30)
- 6 Rnd: (4 sc, inc)*6 (36)
- 7 Rnd: (5 sc, inc)*6 (42)
- 8 Rnd: (6 sc, inc)*6 (48)
- 9 Rnd: (7 sc, inc)*6 (54)
- 10-15 Rnd: 54 sc (6 rounds) (54)
Note: Insert the 12 mm safety eyes between rows 11 and 12, leaving about 1-2 stitches between them.
- 16 Rnd: (7 sc, dec)*6 (48)
- 17 Rnd: (6 sc, dec)*6 (42)
- 18 Rnd: (5 sc, dec)*6 (36)
- 19 Rnd: (4 sc, dec)*6 (30)
- 20 Rnd: (3 sc, dec)*6 (24)
- 21 Rnd: (4 sc, dec)*4 (20)
Fasten off, cut the thread, and finish stuffing.
2. Ears (Make 2)
- 1 Rnd: 6 sc in MR (6)
- 2 Rnd: (1 sc, inc)*3 (9)
- 3 Rnd: (2 sc, inc)*3 (12)
- 4 Rnd: (3 sc, inc)*3 (15)
- 5 Rnd: (4 sc, inc)*3 (18)
- 6 Rnd: 18 sc (18)
Fold the piece in half and crochet
8 sc through both sides. Fasten off and leave a tail for sewing. Repeat for the second ear.
3. Arms (Make 2)
Stuff the arms as you crochet (firmer at the bottom, lighter toward the shoulder).
- 1 Rnd: 6 sc in MR (6)
- 2 Rnd: 6 inc (12)
- 3-5 Rnd: 12 sc (3 rounds) (12)
- 6 Rnd: (2 sc, dec)*3 (9)
- 7-13 Rnd: 9 sc (7 rounds) (9)
Fold the opening in half and crochet
4 sc across both edges to close. Fasten off.
4. Tail
Do not stuff the tail; it will be crocheted directly into the body later.
- 1 Rnd: 6 sc in MR (6)
- 2-7 Rnd: 6 sc (6 rounds) (6)
Fasten off.
5. Legs and Body
Leg 1:
- 1 Rnd: 6 sc in MR (6)
- 2 Rnd: 6 inc (12)
- 3 Rnd: (1 sc, inc)*6 (18)
- 4-7 Rnd: 18 sc (4 rounds) (18)
Fasten off and cut.
Leg 2 & Body Joining:
Crochet the second leg identically, but do not cut the thread. Make a slip stitch (sl-st) and
4 ch, then attach to the first leg using a sl-st. Place your stitch marker at the back center.
- 8 Rnd: 18 sc (on left leg), 4 sc in chain, 18 sc (on right leg), 4 sc in chain (44)
Fill tightly with holofiber as you go.
- 9 Rnd: 44 sc (44)
- 10 Rnd: inc, 8 sc, inc, 7 sc, 6 inc, 7 sc, inc, 8 sc, inc, 4 sc (54) (Note: Increases are positioned behind the connecting chain, sides, and tummy).
- 11 Rnd: 54 sc (54)
- 12 Rnd: 51 sc, 3 sc (crocheted together with the tail centered between the legs) (54)
- 13-18 Rnd: 54 sc (6 rounds) (54)
- 19 Rnd: (7 sc, dec)*6 (48)
- 20 Rnd: 48 sc (48)
- 21 Rnd: (6 sc, dec)*6 (42)
- 22 Rnd: 42 sc (42)
- 23 Rnd: (5 sc, dec)*6 (36)
- 24 Rnd: 36 sc (36)
- 25 Rnd: (4 sc, dec)*6 (30)
- 26 Rnd: 30 sc (30)
- 27 Rnd: (3 sc, dec)*6 (24)
- 28 Rnd: 5 sc, 4 sc (attaching first arm), 8 sc, 4 sc (attaching second arm), 3 sc (24)
- 29 Rnd: (4 sc, dec)*4 (20)
Fasten off, cut the thread, and stuff the body firmly.
6. Furry Tummy Patch
Using Alize Softy yarn and a number
2 crochet hook:
Chain
15 ch.
- 1 Rnd: In the second chain from the hook make 1 sc, then 12 sc, make 3 sc in the last loop, work 12 sc on the opposite side, and an inc in the very last loop. Place marker at the start of the row (30).
- 2 Rnd: inc, 12 sc, 3 inc, 12 sc, 2 inc (36)
- 3 Rnd: (1 sc, inc), 12 sc, (1 sc, inc)*3, 12 sc, (1 sc, inc)*2 (42)
- 4 Rnd: (2 sc, inc), 12 sc, (2 sc, inc)*3, 12 sc, (2 sc, inc)*2 (48)
- 5 Rnd: (3 sc, inc), 12 sc, (3 sc, inc)*3, 12 sc, (3 sc, inc)*2 (54)
- 6 Rnd: (4 sc, inc), 12 sc, (4 sc, inc)*3, 12 sc, (4 sc, inc)*2 (60)
- 7 Rnd: (5 sc, inc), 12 sc, (5 sc, inc)*3, 12 sc, (5 sc, inc)*2 (66)
Fasten off, leaving a long tail for sewing (or use regular sewing thread).
Assembly & Facial Details
Pin the fuzzy tummy patch to the center of the body and sew it securely in place.
- Face: Embroider the nose right under the eyes with pink thread, leaving about 1-2 stitches of distance. Embroider whiskers/antennae (approx. 7 sc in length) and symmetrical eyebrows to your preference.
- Head & Ears: Sew the ears onto the head, and attach the head to the body, making sure to stuff the neck area extremely tightly with holofiber to keep the head stable.
Frequently Asked Questions (FAQ)
1. What yarn is recommended for this plush green cat?
The pattern calls for Himalaya Dolphin Baby plush velvet yarn for the main body and Alize Softy yarn for the furry belly patch.
2. How do I adjust the size of the belly patch?
Be sure to do a gauge sample! If the belly looks too large or too small for your body, you can easily add or shorten a couple of rows.
3. Are safety eyes mandatory?
The design utilizes 12 mm safety eyes, but you can substitute them with embroidered eyes if you are making this toy for a young child.
Conclusion
Congratulations! Your plush green cat amigurumi is complete. With its velvety texture and sweet furry belly, it makes a wonderful companion or handmade gift. Keep your hooks ready and enjoy your crafting journey!
Want to take this pattern offline?
Click here to download the free PDF pattern!